SunCurve — 防犯カメラの、その先へ。AIで、暮らしとビジネスに新しい可能性を。SunCurve — Beyond security cameras. Opening new possibilities for everyday life and business with AI.
CURVION WiFi HaLow Bridge
Ethernet Air クイック説明書Ethernet Air Quick Manual
メーカー資料をもとに、CURVION ブランド表記を加え、現場で確認しやすい手順ページとして再構成しました。インターフェース、ペア接続、アンテナ、壁面取付、配線、付属品、主要仕様をまとめています。Based on the manufacturer guide, this CURVION-branded page reorganizes the interface, pair connection, antenna, wall mounting, cabling, package checklist, and key specifications for field use.
本機は送信側 TX と受信側 RX のペアで使います。見通し、設置高、電源、LAN ケーブル経路を確認してから取り付けてください。Use the units as a TX and RX pair. Confirm line of sight, mounting height, power availability, and LAN cable routing before installation.
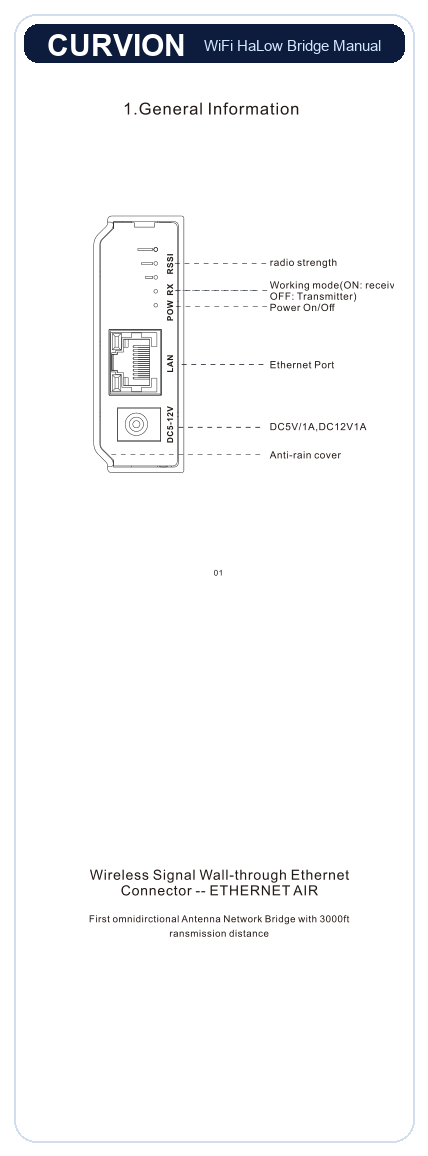
LED 表示: 電源、TX/RX モード、電波強度を確認LED indicators: power, TX/RX mode, and radio strength
端子: LAN ポート、DC5V/1A または DC12V/1APorts: LAN port and DC5V/1A or DC12V/1A input
屋外利用時は雨よけカバーと防水処理を確認For outdoor use, confirm the anti-rain cover and waterproofing
想定用途Typical Use
建屋と離れたカメラ設置点、階をまたぐ通信、農地やヤードなど、通常の Wi-Fi が届きにくい場所の Ethernet 延長に使います。Use it to extend Ethernet between a building and remote camera point, across floors, or in farms and yards where regular Wi-Fi does not reach well.
資料上の通信距離は最大 3000ft、1080P 映像伝送条件での表記です。実際の距離は障害物、設置高、電波環境、カメラ帯域で変わります。The manufacturer sheet lists up to 3000ft with 1080P video. Real range depends on obstacles, height, radio conditions, and camera bandwidth.
取付手順Installation Steps
図を見ながら順番に確認Follow the diagrams in order
各図には CURVION ブランドヘッダーを追加し、現場で印刷・共有しやすい形に整えています。Each diagram has been prepared with a CURVION brand header for easier field sharing and printing.
01
本体表示と端子を確認Check indicators and ports
電波強度、TX/RX モード、電源表示、LAN ポート、電源端子、雨よけカバーを確認します。Confirm radio strength, TX/RX mode, power indicator, LAN port, power input, and anti-rain cover.
02
TX/RX を配置して接続Place TX and RX units
送信側と受信側を見通しの良い位置に置きます。資料では 1500ft / 500m や 4 階程度の例が示されています。Place the TX and RX with a clear path. The sheet shows examples around 1500ft / 500m and a four-floor bridge.
03
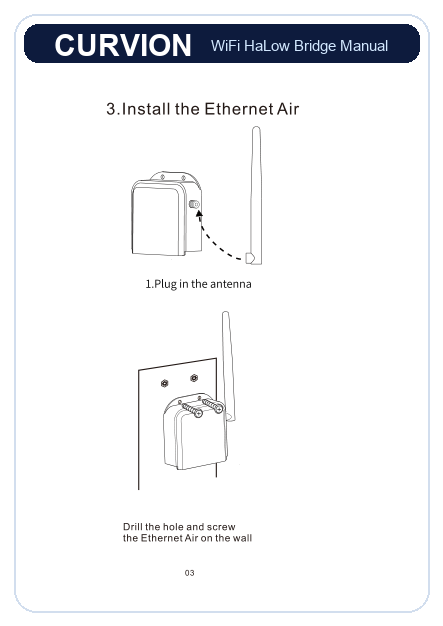
アンテナと壁面固定Install antenna and mount
アンテナを取り付け、本体を壁面へ固定します。屋外では固定後に防水とケーブルの下向き処理を確認してください。Attach the antenna and mount the unit on the wall. Outdoors, confirm waterproofing and downward cable routing after mounting.
04
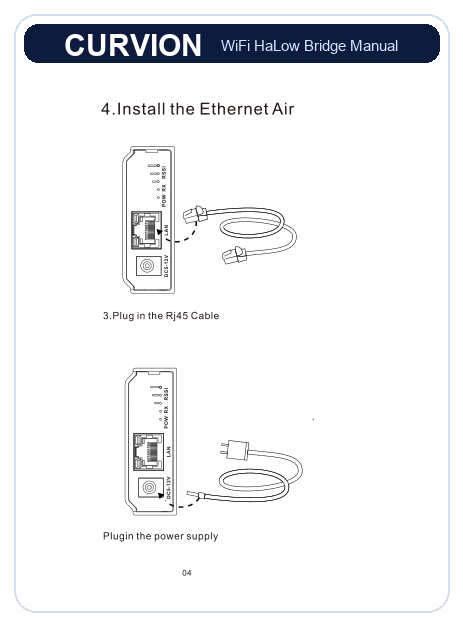
LAN と電源を接続Connect LAN and power
RJ45 ケーブルを LAN ポートに接続し、電源アダプターを接続します。接続後に LED 表示を確認します。Connect the RJ45 cable to the LAN port, then connect the power adapter. Check the LED indicators after power-up.
05
付属品を確認Check package items
本体、ネジ、固定用部品、LAN ケーブル、電源アダプター、無指向性アンテナがそろっているか確認します。Confirm the unit, screws, fixing accessories, Ethernet cable, power adapter, and omnidirectional antenna are included.
06
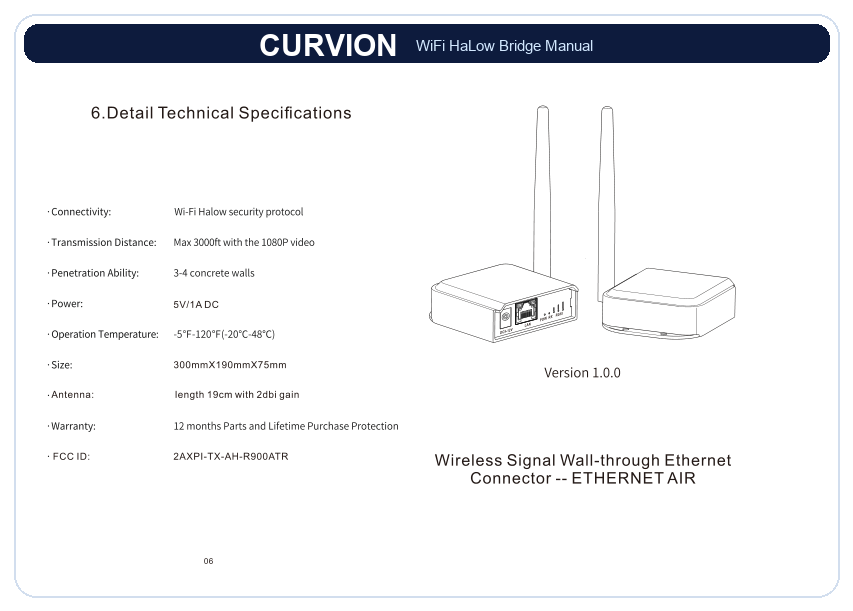
主要仕様を確認Review key specifications
電源、温度範囲、本体サイズ、アンテナ長、保証、FCC ID などの基本仕様を確認します。Review power, operating temperature, size, antenna length, warranty, FCC ID, and other base specifications.